Woodville, Richard Caton (1825-55) (after) Assets (50 in total)

Search options

Orientation
Colour

Display options

View

Print

To print search results, use print friendly version of this page.

Results

The Charge of the Light Brigade, 1895 (photogravure)

NAM280972: The Charge of the Light Brigade, 1895 (photogravure), Woodville, Richard Caton (1825-55) (after) / National Army Museum, London / Bridgeman Images

Russian Cossack Artillery engaging the Chinese outside Peking, illustration from 'Battles of the Nineteenth Century: Vol. VII, The Chinese War of 1900-1901' by Archibald Forbes, G.A. Henty and Major Arthur Griffiths (litho)

STC403943: Russian Cossack Artillery engaging the Chinese outside Peking, illustration from 'Battles of the Nineteenth Century: Vol. VII, The Chinese War of 1900-1901' by Archibald Forbes, G.A. Henty and Major Arthur Griffiths (litho), Woodville, Richard Caton (1825-55) (after) / Private Collection / Bridgeman Images

A Bengal Lancer and his Boxer captive, illustration from 'Battles of the Nineteenth Century: Vol. VII, The Chinese War of 1900-1901' by Archibald Forbes, G.A. Henty and Major Arthur Griffiths (litho)

STC403949: A Bengal Lancer and his Boxer captive, illustration from 'Battles of the Nineteenth Century: Vol. VII, The Chinese War of 1900-1901' by Archibald Forbes, G.A. Henty and Major Arthur Griffiths (litho), Woodville, Richard Caton (1825-55) (after) / Private Collection / Bridgeman Images

The Battle of Towton in 1461, illustration from 'Hutchinson's Story of the British Nation' (litho)

IL238072: The Battle of Towton in 1461, illustration from 'Hutchinson's Story of the British Nation' (litho), Woodville, Richard Caton (1825-55) (after) / Private Collection / Bridgeman Images

The fighting round Tientsin: Charge of the Japanese Cavalry, illustration from 'Battles of the Nineteenth Century: Vol. VII, The Chinese War of 1900-1901' by Archibald Forbes, G.A. Henty and Major Arthur Griffiths (litho)

STC403944: The fighting round Tientsin: Charge of the Japanese Cavalry, illustration from 'Battles of the Nineteenth Century: Vol. VII, The Chinese War of 1900-1901' by Archibald Forbes, G.A. Henty and Major Arthur Griffiths (litho), Woodville, Richard Caton (1825-55) (after) / Private Collection / Bridgeman Images

Lord Roberts' (1832-1914) Entry into Pretoria on 5th June 1900 (colour litho)

INN181314: Lord Roberts' (1832-1914) Entry into Pretoria on 5th June 1900 (colour litho), Woodville, Richard Caton (1825-55) (after) / Private Collection / Bridgeman Images

Akbar the Great receives Queen Elizabeth's Ambassador in 1599 (litho)

PNP350909: Akbar the Great receives Queen Elizabeth's Ambassador in 1599 (litho), Woodville, Richard Caton (1825-55) (after) / Private Collection / Bridgeman Images

STC403963: "Fix Bayonets!" In the Trenches at Ladysmith, illustration from 'Battles of the Nineteenth Century, Vol. VI: The Boer War of 1899-1900' by Archibald Forbes, G.A. Henty and Major Arthur Griffiths (colour litho), Woodville, Richard Caton (1825-55) (after) / Private Collection / Bridgeman Images

The British in Natal in 1824, illustration from 'Hutchinson's Story of the British Nation' (litho)

IL370593: The British in Natal in 1824, illustration from 'Hutchinson's Story of the British Nation' (litho), Woodville, Richard Caton (1825-55) (after) / Private Collection / Bridgeman Images

Battle of Plassey, 23rd June 1757 (litho)

PNP315910: Battle of Plassey, 23rd June 1757 (litho), Woodville, Richard Caton (1825-55) (after) / Private Collection / Bridgeman Images

The Last Shot in the Soudan, from 'The Illustrated London News', 20th June 1885 (colour litho)

XCF275008: The Last Shot in the Soudan, from 'The Illustrated London News', 20th June 1885 (colour litho), Woodville, Richard Caton (1825-55) (after) / Private Collection / Bridgeman Images

Sir George Simpson in Vancouver Island, 1855, illustration from 'Hutchinson's Story of the British Nation', c.1923 (litho)

IL370595: Sir George Simpson in Vancouver Island, 1855, illustration from 'Hutchinson's Story of the British Nation', c.1923 (litho), Woodville, Richard Caton (1825-55) (after) / Private Collection / Bridgeman Images

The cession of Hong Kong to the British, 1841, illustration from 'Hutchinson's Story of the British Nation', c.1923 (litho)

IL370597: The cession of Hong Kong to the British, 1841, illustration from 'Hutchinson's Story of the British Nation', c.1923 (litho), Woodville, Richard Caton (1825-55) (after) / Private Collection / Bridgeman Images

The Matabele War, 1893: Attack on the Laager of Wagons on the Imbembezi River, November 1st, from 'The Illustrated London News', 1901 (litho)

STC361088: The Matabele War, 1893: Attack on the Laager of Wagons on the Imbembezi River, November 1st, from 'The Illustrated London News', 1901 (litho), Woodville, Richard Caton (1825-55) (after) / Private Collection / Bridgeman Images

The Irish Land League Agitation: Scots Greys charging the mob at Limerick, illustration from 'The Illustrated London News', October 29th 1881 (engraving)

XJF347942: The Irish Land League Agitation: Scots Greys charging the mob at Limerick, illustration from 'The Illustrated London News', October 29th 1881 (engraving), Woodville, Richard Caton (1825-55) (after) / Private Collection / Bridgeman Images

The Charge of the Scots in Waterloo - painting by Caton Woodville, 19th century

LSE4091370: The Charge of the Scots in Waterloo - painting by Caton Woodville, 19th century, Woodville, Richard Caton (1825-55) (after) / Private Collection / Bridgeman Images

Mexican News, c. 1851 (hand-coloured engraving on wove paper)

HST2633547: Mexican News, c. 1851 (hand-coloured engraving on wove paper), Woodville, Richard Caton (1825-55) (after) / Museum of Fine Arts, Houston, Texas, USA / Bridgeman Images

Colonialism in Sri Lanka. (Illustration, 1924)

CCI5975761: Colonialism in Sri Lanka. (Illustration, 1924), Woodville, Richard Caton (1825-55) (after) / Private Collection / Bridgeman Images

Waiting for the Stage (colour litho)

PNP245997: Waiting for the Stage (colour litho), Woodville, Richard Caton (1825-55) (after) / Private Collection / Bridgeman Images

'The bonny men led the advance', illustration from 'Battles of the Nineteenth Century' by Archibald Forbes, G.A. Henty and Major Arthur Griffiths (litho)

STC397067: 'The bonny men led the advance', illustration from 'Battles of the Nineteenth Century' by Archibald Forbes, G.A. Henty and Major Arthur Griffiths (litho), Woodville, Richard Caton (1825-55) (after) / Private Collection / Bridgeman Images

The gross of the Bulgarian column made a dashing assault upon the town, illustration from 'Battles of the Nineteenth Century' by Archibald Forbes, G.A. Henty and Major Arthur Griffiths (litho)

STC397100: The gross of the Bulgarian column made a dashing assault upon the town, illustration from 'Battles of the Nineteenth Century' by Archibald Forbes, G.A. Henty and Major Arthur Griffiths (litho), Woodville, Richard Caton (1825-55) (after) / Private Collection / Bridgeman Images

Vespasian rescued by his son Titus, illustration from 'Hutchinson's History of the Nations', c.1910 (litho)

IL494400: Vespasian rescued by his son Titus, illustration from 'Hutchinson's History of the Nations', c.1910 (litho), Woodville, Richard Caton (1825-55) (after) / Private Collection / Bridgeman Images

Dervish warriors at Omdurman, Charge of the 21st Lancers (litho)

PNP412175: Dervish warriors at Omdurman, Charge of the 21st Lancers (litho), Woodville, Richard Caton (1825-55) (after) / Private Collection / Bridgeman Images

The Battle of Alma (litho)

IL388044: The Battle of Alma (litho), Woodville, Richard Caton (1825-55) (after) / Private Collection / Bridgeman Images

A Gilbertian strike scene outside the Savoy, 1910 (litho) (b/w photo)

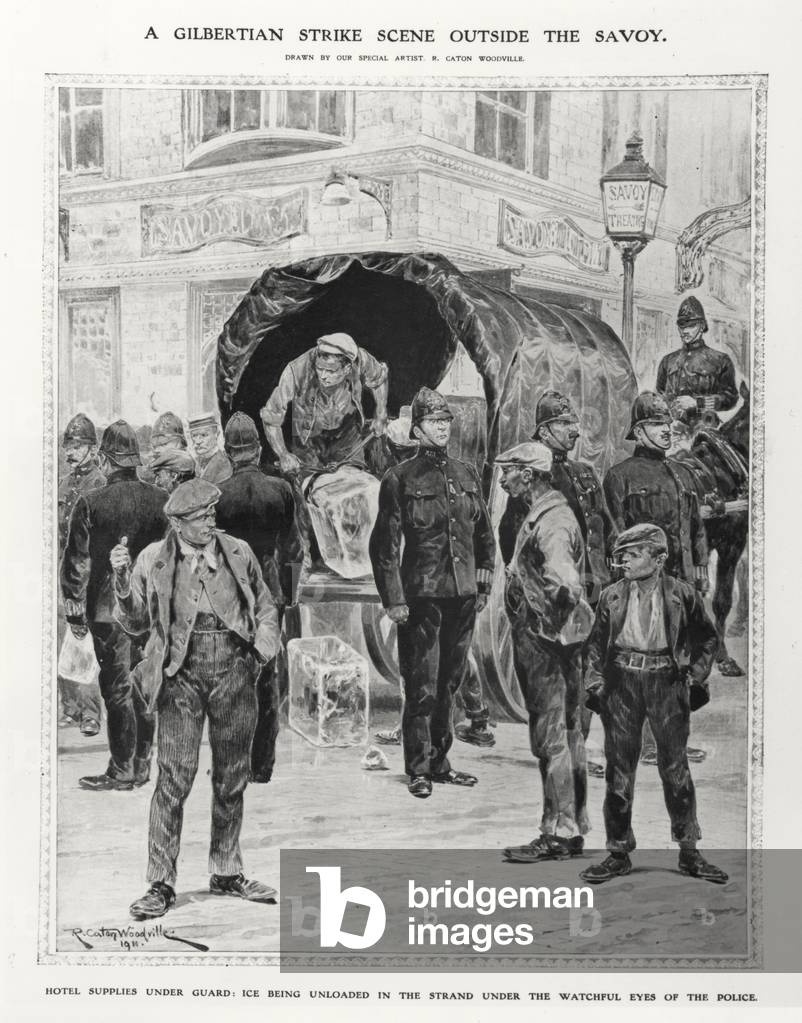
XJF139053: A Gilbertian strike scene outside the Savoy, 1910 (litho) (b/w photo), Woodville, Richard Caton (1825-55) (after) / Private Collection / Bridgeman Images

The Battle of Salamanca, illustration from 'Hutchinson's History of the Nations' (litho)

IL370623: The Battle of Salamanca, illustration from 'Hutchinson's History of the Nations' (litho), Woodville, Richard Caton (1825-55) (after) / Private Collection / Bridgeman Images

British troops entering Singapore, 1824, illustration from 'Hutchinson's Story of the British Nation' (litho)

IL370594: British troops entering Singapore, 1824, illustration from 'Hutchinson's Story of the British Nation' (litho), Woodville, Richard Caton (1825-55) (after) / Private Collection / Bridgeman Images

The Battle of Quebec, 1759, illustration from 'Hutchinson's Story of the British Nation', c.1923 (litho)

IL370607: The Battle of Quebec, 1759, illustration from 'Hutchinson's Story of the British Nation', c.1923 (litho), Woodville, Richard Caton (1825-55) (after) / Private Collection / Bridgeman Images

Sri Vikrama Rajasinha, king of Kandy (Sri Lanka) dismissed by the English in 1815. 1924 (Illustration)

CCI6437977: Sri Vikrama Rajasinha, king of Kandy (Sri Lanka) dismissed by the English in 1815. 1924 (Illustration), Woodville, Richard Caton (1825-55) (after) / Private Collection / Bridgeman Images

Lord Kitchener's Conquest of the Soudan, 1896-98 - Mahmoud, the Khalifa's Chief Lieutenant, taken Captive after the Battle of Atbara, from 'The Illustrated London News', 1901 (litho)

STC361087: Lord Kitchener's Conquest of the Soudan, 1896-98 - Mahmoud, the Khalifa's Chief Lieutenant, taken Captive after the Battle of Atbara, from 'The Illustrated London News', 1901 (litho), Woodville, Richard Caton (1825-55) (after) / Private Collection / Bridgeman Images

The Seaforth Highlanders storming the zareba at the Battle of Atbara, illustration from 'Battles of the Nineteenth Century' Vol. V: Campaigns of the Nineties, by A. Hilliard Atteridge (litho)

STC403921: The Seaforth Highlanders storming the zareba at the Battle of Atbara, illustration from 'Battles of the Nineteenth Century' Vol. V: Campaigns of the Nineties, by A. Hilliard Atteridge (litho), Woodville, Richard Caton (1825-55) (after) / Private Collection / Bridgeman Images

The Battle of Colenso: the loss of our guns, illustration from 'Battles of the Nineteenth Century, Vol. VI: The Boer War of 1899-1900' by Archibald Forbes, G.A. Henty and Major Arthur Griffiths (litho)

STC403962: The Battle of Colenso: the loss of our guns, illustration from 'Battles of the Nineteenth Century, Vol. VI: The Boer War of 1899-1900' by Archibald Forbes, G.A. Henty and Major Arthur Griffiths (litho), Woodville, Richard Caton (1825-55) (after) / Private Collection / Bridgeman Images

Sir Eyre Coote at Cuddalore, illustration from 'Hutchinson's History of the Nations' (litho)

IL370624: Sir Eyre Coote at Cuddalore, illustration from 'Hutchinson's History of the Nations' (litho), Woodville, Richard Caton (1825-55) (after) / Private Collection / Bridgeman Images

British forces marching into Cape Town, illustration from 'Hutchinson's Story of the British Nation' (litho)

IL370592: British forces marching into Cape Town, illustration from 'Hutchinson's Story of the British Nation' (litho), Woodville, Richard Caton (1825-55) (after) / Private Collection / Bridgeman Images

The Russo-Japanese War: a hand-to-hand struggle in the earthworks at Port Arthur (litho)

STC358043: The Russo-Japanese War: a hand-to-hand struggle in the earthworks at Port Arthur (litho), Woodville, Richard Caton (1825-55) (after) / Private Collection / Bridgeman Images

Captain Cook approaching New Zealand, illustration from 'Hutchinson's Story of the British Nation', c.1923 (litho)

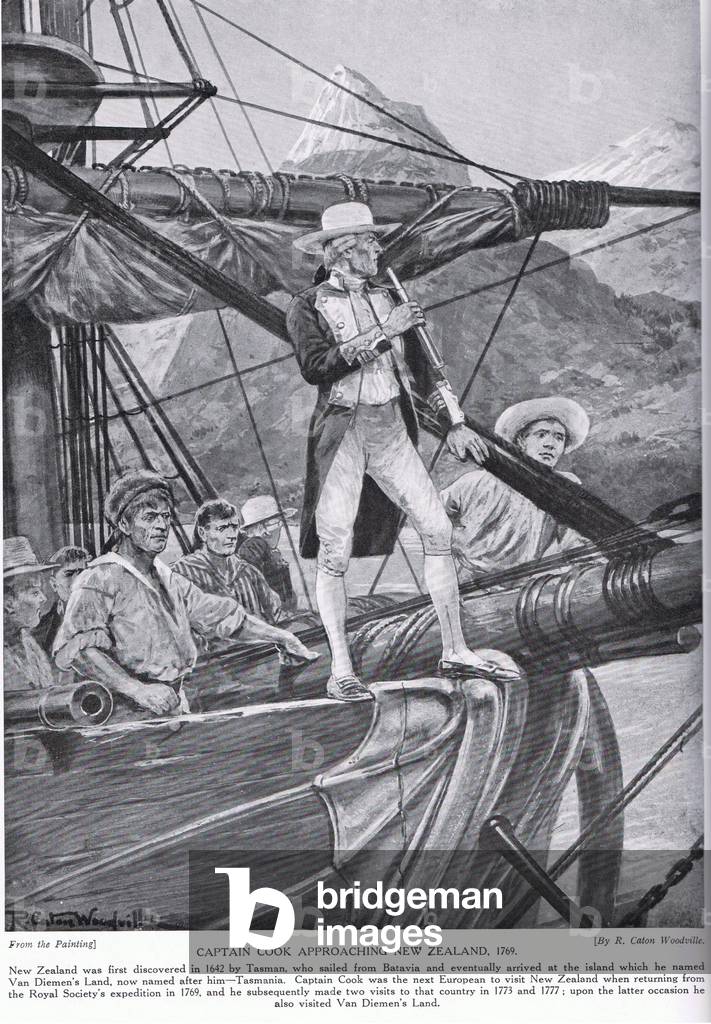
IL370610: Captain Cook approaching New Zealand, illustration from 'Hutchinson's Story of the British Nation', c.1923 (litho), Woodville, Richard Caton (1825-55) (after) / Private Collection / Bridgeman Images


Back to top